Head Gasket Replacement
Starting Symptoms
I had purchased this car around 4 months prior, and as I drove it home one day, I had noticed the radiator fan was on when I walked away from the car.
After checking the coolant temperature, it was at 220°F, which is much higher than operating temperature of around 185°F. My car was overheating. When I started it up again to see if it was just a fluke, the engine power was being throttled after hitting high temperatures, and the engine felt different.
Water Pump/Thermometer
I figured the most likely culprit was the water pump going bad, which was a common issue on these cars. Since I was in the middle of college classes, I took it to the local mechanic, as I figured it was worth getting this replaced by someone else. They replaced the thermometer, tested my water pump, and flushed the coolant system. It was still overheating.
Starting Investigation
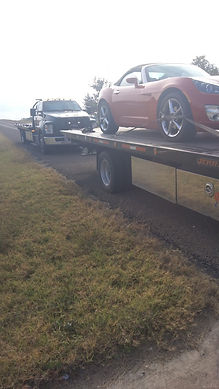
The mechanics said that I should check my head gasket blown, as when they tried vacuuming the air out the coolant lines, it kept sucking gas from somewhere. They quoted me $3500 for the replacement of the head gasket. I decided that I would test it myself to see if the head gasket was truly blown at my own house, so I had the car towed back.


Block Tester
I wanted to verify the statements from the mechanic, so I purchased a block tester, this tester plugs into the coolant reservoir, and sucks in air from the system. When I tested my coolant, mine turned yellow. This indicates that there are chemicals that are found in exhaust gases present in my coolant, indicating that there was a leak from my combustion chambers into the coolant lines. The head gasket tends to be the first point of failure for this, so it was most likely the culprit.
Pre-Service
I wasn't 100% sure that it was just the head gasket that needed to be replaced, but I was fairly certain that it was the culprit, so I prepared my garage for working, removed the hood, and ordered all the pieces that I would need for the job.
Removing the Head
I started by removing the valve cover, coilpacks and the spark plugs. The two biggest components after that were removing the Intake manifold and the Exhaust manifold. The intake manifold was rather straightforward, but the exhaust manifold was it's own project, requiring me to remove the catalyictic converter, and then remove the turbocharger setup, both having some of the most inaccessible bolts I've seen in my life.
I would also need to remove the camshaft phaser sprockets, which are connected to the timing chain. My original plan was to clamp the chain down so I couldn't mess up my engine's timing during the gasket replacement, but I accidentally rotated the entire timing chain and skipped a few links on some sprockets. This meant my timing was now messed up, and I would have to completely re-assemble my timing chain as well, if I didn't want the engine to damage itself, since it's an interference engine.

Replacing the Head Gasket
Once I had gotten down to the head gasket, replacing it was somewhat underwhelming. It was simple to replace, just pulling it out, cleaning it up, then putting the new one back in. While I was in the engine, I cleaned up the carbon deposits on the pistons, and I also checked the flatness of the engine head using a machined flatedge, and a feeler gauge. I also decided to snap a polaroid so I had physical evidence of each job I did.


Timing Chain Replacement
Removing the old Timing Chain
I had ordered a complete replacement for not only the timing chain, but the tensioners, sprockets, and chain guides. But in order to get to these components I needed to remove my airbox, and radiator fan. Lots of forums said to remove the radiator too, but I found this to be unnecessary.

Replacing the Timing Chain
After pulling out the chain, I replaced all of the sprockets inside of the timing system, including the water pump one, the camshaft phaser sprockets, along with all of the tensioners and the chain itself. I made sure to align each mark on the sprocket teeth to the colored links in order to ensure proper timing of the engine.

Discovering the Root Cause
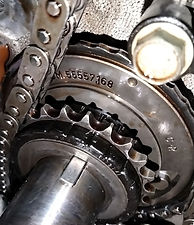
After opening the front cover on the engine that housed the timing components, I discovered a broken tensioner. I figured that this was broken by me when I messed up the timing, but I saw another piece that told me everything.
Shown in the pictures on the left is the sprocket that connected to the water pump. It is completely stripped of its teeth. The tensioner that snapped is the one that tensions the chain this sprocket is attached to.
I can conclude from this evidence, that a chain tensioner snapped during engine usage, causing the chain on the water pump sprocket to wear down. The issue caused a significant reduction in cooling efficiency, leading to engine overheating and subsequent head gasket failure.

Reassembling and Testing
After putting the turbo, the manifolds, and the catalytic converter in, I changed both the oil, and flushed the coolant a second time, and vacuumed out the air with a tool I had purchased. It had been around a month since I had started taking the car apart. The Engine started up and I took it for a test drive, it took me a couple of days to get all of the air bubbles in the coolant out, but I was able to drive it back to college just around the time winter break ended.
Electrical Gremlin
Starting Symptoms
I was driving to visit my grandma one day, and on the way, my check engine light came on, my car started chiming, and instantly told me that it was disabling traction control, and greatly reducing the engine power. I pulled over checked the codes, and was able to limp my way home on some backroads.
My OBD Reader presented the Following Codes
-P0652 - Powertrain
-P2138 - Powertrain Throttle/Pedal Position Sensor/Switch D/E Voltage Correlation
-P0016 - Powertrain Crank-Cam position correlation
-P2122 - Powertrain Throttle/Pedal Position Sensor/Switch D Circuit Low Input
=

First Round of Fixes
Based on the codes, my first assumption was that I needed to replace my gas pedal. I quickly discovered that that was not the issue. I read online to check for corroded grounding points, so I checked all of the grounding points in my engine bay, and completely stripped my interior to get better access to the wiring connectors, grounding points, and see the overall wiring harness better. There was an incredibly violent storm that happened before the issue came up, and I started to suspect that it may have led to the issue, as some water had intruded into my interior, as there was some pooled under the carpet.
More Research
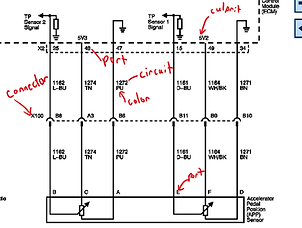
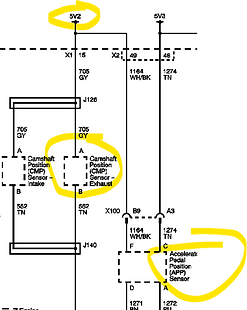
I decided to revisit the error codes and looked a bit closer at them. I found it strange that my camshaft position sensor had failed at the same time as my gas pedal. It just seemed unlikely. I decided to take a look into the official wiring diagrams of the car. After pouring through pages of irrelevant information I found the diagram I needed. Each diagram also contained descriptions of what the wires looked like, along with what types of connectors they used, which would be useful in determining which wire it was specifically in the car. By looking at this diagram, I found an incredibly important piece of information. The camshaft position sensors along with one of the pedal position sensors were powered by the same 5-volt reference line, which meant that if there was an electrical short, that it would have to be somewhere in this isolated system.
Execution
The first thing I did was clean all of the grounding points, inspecting them for corrosion, next, I checked all of the main harness connectors, and the connects present in the diagram for any water intrusion, and flushed all relevant connections with electronic cleaner, along with the ports in the ECM, since that's the origin point of the 5V reference line.
Next, I tested all of the electronics modules themselves, testing for shorts between all of their ports, then testing the wires they were connected to for shorts to ground, I did this by using a multimeter and testing for continuity with the electronics respective ground spot after isolating the system from power. I started at the Acceleration Pedal Position Sensor, then the wires around it. Everything tested as good and isolated, until I got to the Camshaft position sensors.
Finding the Issue
I wanted to test the camshaft position sensors with the multimeter, but I couldn't get to them and their wiring, as it was in a tight spot behind the engine, and there's no way I could get the multimeter probes to fit. I decided to just replace them, since it was the only thing that wasn't confirmed to be working, and they were only around $20 for a set.
My suspicions were correct, since the error dissapeared after replacing them.
Based on this information, my theory is that the water from the storm shorted the camshaft sensors, damaging them, and causing them to short to ground, lowering the voltage of the whole line, causing the pedal position sensor to act up as well.

Future Plans
While I can't ensure that this car will run without flaws in the future, it's definitely running and driving smoothly for now, especially with a cleaned engine, new gasket, timing chain, and dusted electronics. It's also been tested on a couple road trips to really shakedown anything and it performed without any problems.
My next project involves working on a 2003 Mercedes SL500, which had two of its hydraulic suspension struts break down during the shakedown road-trip with the Saturn Sky.